| |
|
Configuring your FirstClass account for synchronization
Contact entries on FirstClass must have at least a first or last name to synchronize. Entries with only a "Quick Name" will not synchronize.
To ensure that your contacts are set up correctly:
1 Choose Edit > Preferences.
2 Select the General tab.
3 Choose Default at "Contact form".
Entries that do not contain relevant data are not synchronized. For example, if you have a FirstClass contact with just the home address but your phone supports only phone numbers, then that entry is not synchronized.
Your FirstClass user account can support up to four different SyncML devices and/or applications at the same time.
When adding a new device for synchronization, it is advisable that the initial synchronization be one-way, meaning that the data comes either from FirstClass or your remote device, but not both. A one-way synchronization avoids confusion concerning duplication of data. There are a number of ways to accomplish a one-way synchronization.
• Delete all contacts on the device, making sure that all of your contacts are on the FirstClass server. (Recommended).
• Delete (or move to another container) all contacts on the FirstClass server, leaving the Contacts container empty. Make sure all of your contacts are on the device.
• Consolidate your FirstClass and device contacts to illiminate the possiblity of duplicates.
Preparing your FirstClass account for synchronization
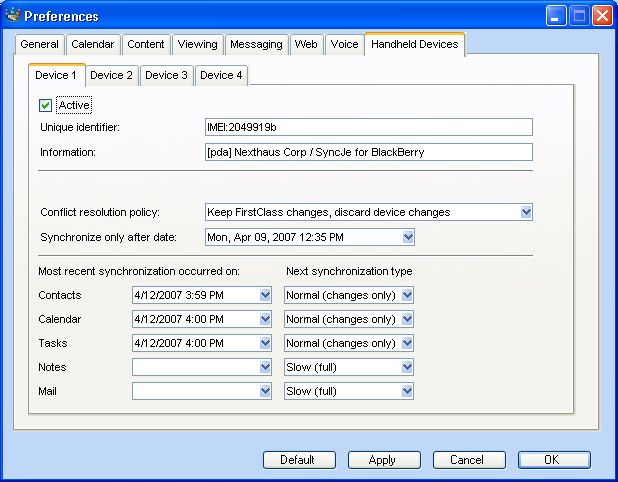
1 Choose Edit > Preferences on your FirstClass Desktop.
2 Select Handheld Devices tab.
If you have not yet synchronized any device with FCSS, none of the Device sub-tabs will have the "Active" checkbox selected.
3 Ensure that there is an "Active" checkbox available on one of the Device sub-tabs.
When you start an initial synchronization from a new SyncML device, FCSS automatically selects the first available (non-active) Device sub-tab. Your SyncML device provides FCSS with the "Unique identifier" and "Information" fields. FCSS automatically fills these fields into the selected Device sub-tab and places a checkmark in the associated "Active" checkbox.
You can customize the sychnronization process by adjusting the information for your handheld device on your Preferences form.
Customizing contact synchronization
If you have a number of devices, it is possible to select the destination of specific contact information. On your FirstClass Contacts form, choose the device with which you wish to synchronize specific entries:
1 Choose File > Open > Contacts on your FirstClass Desktop.
2 Open the contact you wish to synchronize to a specific device.
3 Select the Notes tab.
4 Select or clear the checkbox that corresponds with your customization requirements.
You must have an 8.3 or higher client to see these fields.
If you are synchronizing multiple devices, check in Preferences to see which device is registered under which number.
Removing a device
If the active box is selected on all four sub-tabs of your Handheld Devices preferences form, you will not be able to synchronize any additional devices. However, you can add and remove devices from your registered device list as required.
To remove a device from your synchronization preferences:
1 Choose Edit > Preferences on your FirstClass Desktop.
2 Select Handheld Devices.
3 Select the Device sub-tab with the pertinent information.
4 Clear the Active checkbox.
| ||

